In previous posts, I discussed the construction of an EVPN-VXLAN fabric using Cisco NDFC.
A critical aspect often overlooked — and the focus of this post — is the transition from a traditional 3-tier data centre architecture to an EVPN-VXLAN setup.
One notable challenge in this transition is the configuration of the DHCP relay.
Why DHCP Relay Behaves Differently in EVPN-VXLAN
Traditionally, DHCP relays are configured to identify the default gateway using link-selection (DHCP Option 82 sub-option 5), ensuring IP addresses are allocated from the correct scope.
However, in EVPN-VXLAN, the classic first-hop gateway is replaced by distributed anycast gateways:
- Every leaf provides the same default gateway IP
- Same MAC address
- Same next-hop behaviour
This breaks the traditional relay logic, which depends on unique gateway IPs per leaf.
Cisco resolves this by recommending:
- A per-leaf, per-VRF loopback address
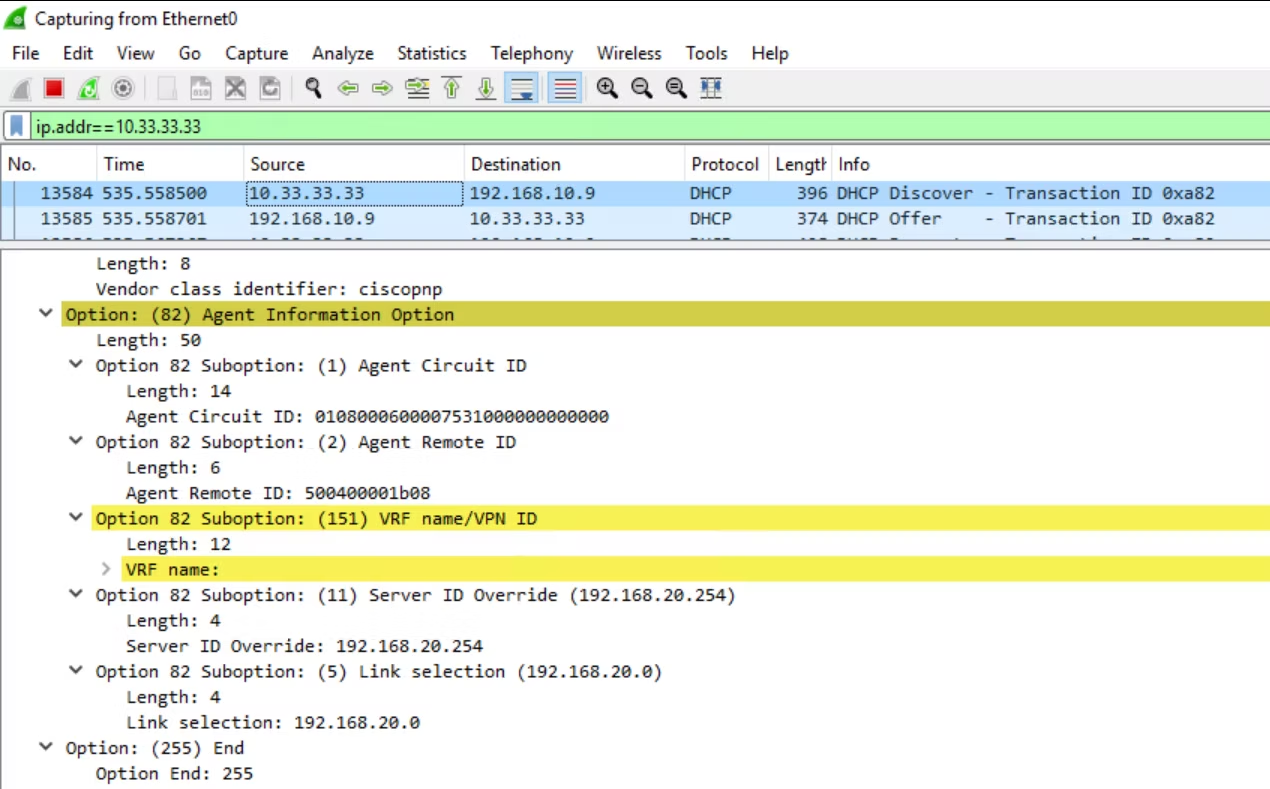
- Additional Option 82 fields:
- Sub-option 151 — VRF name / VPN ID
- Sub-option 11 — Server ID override
- Sub-option 5 — Link selection
These provide enough metadata for the DHCP server to determine the correct scope.
Example Nexus 9000 Relay Configuration
Below is an example configuration for a Nexus 9000 (NX-OS).
This applies both globally and at the SVI level:
feature dhcp
service dhcp

ip dhcp relay information option
ip dhcp relay information option vpn

interface loopback2
vrf member v1
ip address 10.33.33.33/32

interface vlan20
no shutdown
vrf member v1
ip address 192.168.20.254/24 tag 12345
fabric forwarding mode anycast-gateway
ip dhcp relay address 192.168.10.9
ip dhcp relay source-interface loopback2
This ensures:
- DHCP relay metadata is inserted
- The relay source interface (loopback) is stable
- The anycast gateway SVI remains consistent across the fabric
A Key Detail: DHCP Option 82 Sub-option 5
A key element to focus on is Sub-option 5, used for link-selection.
This determines the subnet from which the client must receive an IP address.
Normally:
- The relay agent’s IP (
giaddr) lies inside the client subnet - The DHCP server uses this to identify the correct pool
However…
In EVPN-VXLAN:
The per-VRF loopback address used as the relay source may not fall inside any DHCP scope.
In packet captures, you might see:
giaddr = 10.33.33.33
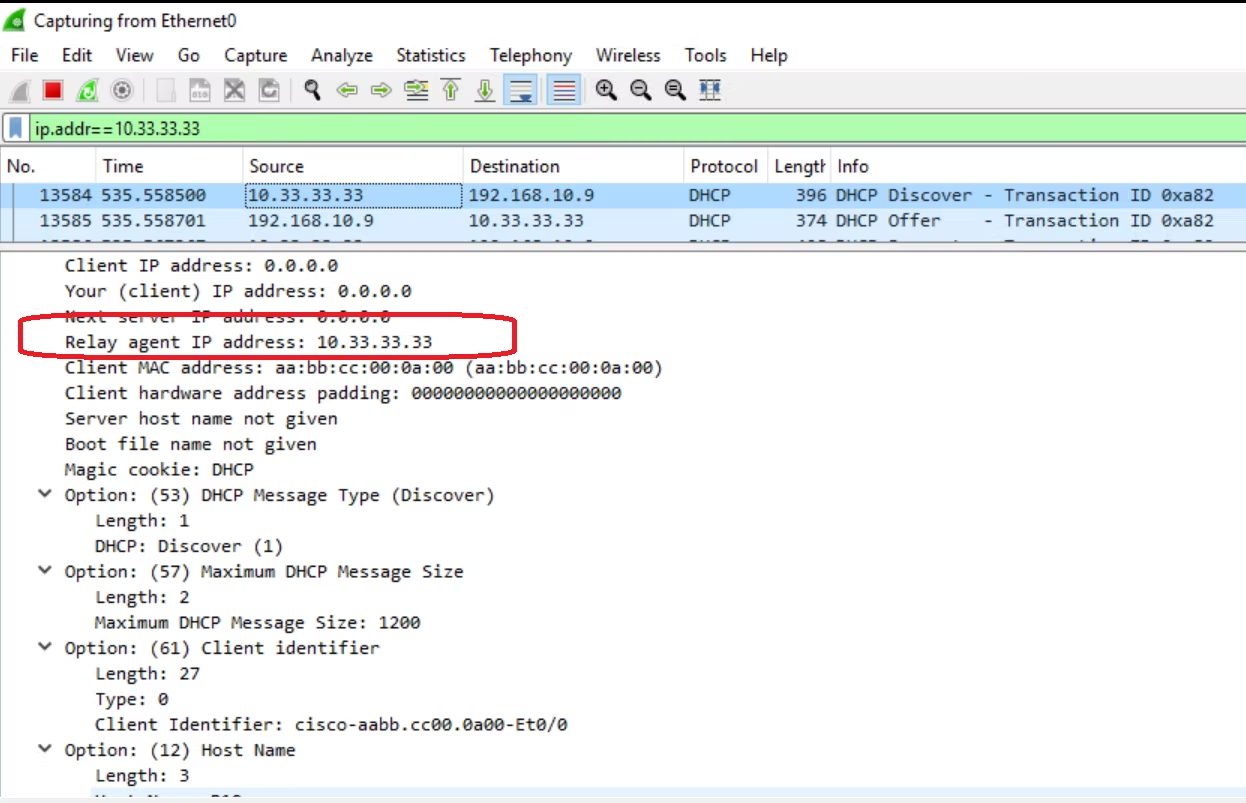
This IP belongs to the leaf loopback, not the client VLAN.
If the DHCP server does not understand link-selection or additional Option 82 fields, it cannot match the correct pool — resulting in failed DHCP allocations.
Linux (isc-dhcp-server) Configuration
Linux DHCP servers (e.g. isc-dhcp-server) handle this scenario cleanly using agent-selection:
subnet 192.168.20.0 netmask 255.255.255.0 {
option agent-selection 192.168.20.0;
option routers 192.168.20.254;
option subnet-mask 255.255.255.0;

range 192.168.20.101 192.168.20.149;
}
option agent-selection ties the request back to the correct subnet, even when giaddr doesn’t belong to the same range.
This tells the DHCP server:
- “This relay is serving subnet 192.168.20.0/24”
- “Use that pool, not the loopback’s subnet”
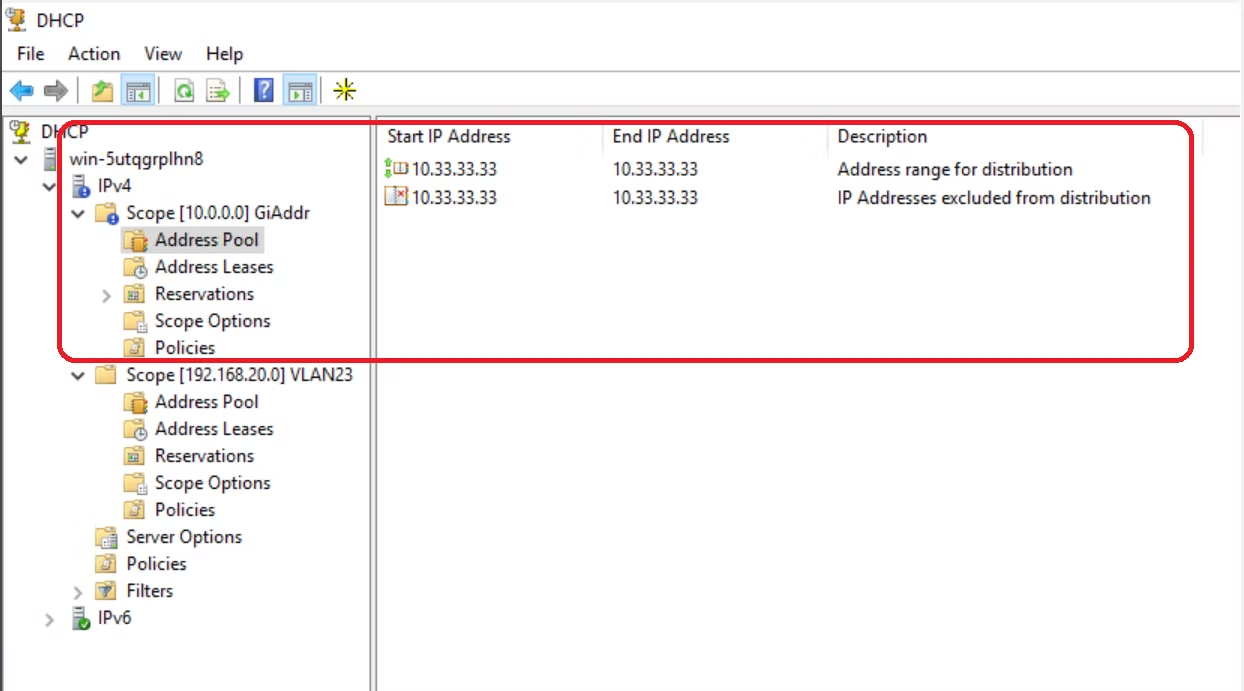
Windows DHCP Server Considerations
Windows Server 2016 introduced support for Option 82 and link-selection.
However, Windows DHCP has stricter validation rules:
- If
giaddrdoes not match any DHCP scope - The relay agent may be flagged as rogue
- DHCP allocation fails
Workaround for Windows Server
Create a catch-all scope for the relay loopback addresses:
- Create a DHCP scope containing all possible
giaddrloopback IPs - Add full exclusions (so the server never allocates these addresses)
- Leave the scope enabled
This scope acts as a placeholder:
- Windows DHCP now recognises the relay IP
- It no longer marks the relay as rogue
- DHCP allocation proceeds using link-selection and valid VLAN scopes
After this, DHCP relay works normally.
Additional Note
Cisco’s community forums include a useful technote demonstrating this behaviour.
Although the article references ACI, the logic is identical for EVPN-VXLAN:
- Same distributed gateway model
- Same Option 82 behaviour
- Same link-selection dependency
Update (Aug 2024): NDFC Supports DHCP Relay natively
Cisco NDFC now includes DHCP relay configuration directly in the UI.
To configure:
- Open the network you want to modify
- Click Action → Edit
- Navigate to Advanced
- DHCP relay configuration options are available there
This simplifies relay deployment across large fabrics and reduces the chance of misconfiguration.
Gary Wong @ Australia — Dec 2023